+ Reply to Thread
Results 1 to 9 of 9

Thread: Insulating an oil barrel arch and stainless pan build question.

  1. #1
    Join Date
    Feb 2017
    Location
    Wisconsin
    Posts
    39

    Default Insulating an oil barrel arch and stainless pan build question.

    I have been reading everything on this site I can find regarding oil barrel arches. I plan to build mine this winter but I have a couple questions. First is on insulation. I realize the reason for using firebrick in the firebox, but is there a reason that in the area where the gasses are passing under the pan back to the stack can it just be insulated with 4 inches of sand instead. and then just run brick on the outside edge of this area? This would be much cheaper (free) and I would think would insulate well. Also, I know that if you use heavier gauge stainless to build the pan you slow your GPH boil rate, but how much do you actually lose. If I were to build it out of 18 gauge verses 16 gauge would there be a noticible difference? Thanks for any input.
    2016-two straws stuck in tree by the kids-1 pint syrup
    2017-40 taps 8 gal. syrup
    2018-70 taps...19 gal syrup
    2019-90 taps....18.5 gal syrup
    2020- 100 taps....25 gal syrup.....new oil barrel arch
    2021- 85 taps....unknown season

  2. #2
    Join Date
    Feb 2018
    Location
    CT
    Posts
    30

    Default

    From what I gathered, there is no reason for firebrick outside of the firebox. The brick has no insulating value, they help retain heat for a high temp combustion chamber. You should still insulate behind the brick. On the transition portion to the exhaust port just use 1” insulating blanket on the bottom and sides to help retain heat in the evap. The bricks also keep the insulation from getting damaged from the wood, which isn’t needed in the other areas of the evap. Hope this helps. A lot of pan makers use 22ga for their pans, not sure on the difference of evap rate but it prob does make a noticable difference.

  3. #3
    Join Date
    Mar 2005
    Location
    Albion PA
    Posts
    5,099

    Default

    For the kids,
    Hope you and your kids make some great memories making syrup. Maybe that's why my dad started making it again when I was a kid? Maybe he had the foresight??
    Anyway. what every you do will work as long as you contain the fire under the pans. Thinner pans are generally better. Since stainless is not a great conductor to begin with, the thinner pan should boil better, sooner, faster. Yea all that good stuff! Tap some tress and Keep boiling!
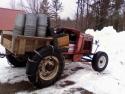
    Regards,
    Chris
    Casbohm Maple and Honey
    625 roadside taps + Neighbors bring some sap too!
    3x10 King, WRU, AOF and AUF
    12" SIRO Filter Press.
    2015 Ford F250 PSD sap hauler
    One Golden named Maggie, Norwegian Forest Cat named Lucy
    Too many Cub Cadets
    Ford Jubilee and several Allis WD's, and IH tractors
    1932 Ford AAB ton and a half, dump truck

    www.mapleandhoney.com

  4. #4
    Join Date
    Feb 2017
    Location
    Wisconsin
    Posts
    39

    Default

    Bmeehan, Thanks for the info on the insulation in the firebox. If I put insulation behind the firebrick how do you attach the firebrick then so it doesn't tip into the firebox? Should I just weld in some standoffs that I can then but keepers on so it holds the brick in place?

    Sugarmaker, the memories are the best. We started 3 years ago when my oldest son, 9 at the time tapped a tree with a straw and a pan below it one spring just for fun. he loved it, watching the drip drip drip. The dog ended up drinking all his handy work, but it didn't take long to hook him, his siblings and yes Me. We put in 50 taps the next year and 80 and 90 the years after. I don't plan to get any bigger then 100 taps ever because all my kids are also wrestlers and spring can be quite busy. for our boiler we used those really large concrete block that you see along the sides of the highway then welded a frame to hold steam table pans and a smoke stack out the back. it worked really well, but like all things, if your not moving forward your moving backward. we always boil to nearly syrup, then let it settle out in pails for 1 week or so and then just pour off the clean from the top to finish. Kids love it and always eat plenty on there pancakes and french toast. we don't sell any, but give away lots to family and friends. We love getting outside that time of year and it helps to break in spring.
    2016-two straws stuck in tree by the kids-1 pint syrup
    2017-40 taps 8 gal. syrup
    2018-70 taps...19 gal syrup
    2019-90 taps....18.5 gal syrup
    2020- 100 taps....25 gal syrup.....new oil barrel arch
    2021- 85 taps....unknown season

  5. #5
    Join Date
    Mar 2005
    Location
    Albion PA
    Posts
    5,099

    Default

    For_the_kids,
    Your doing great! Keep boiling! They may not wrestle forever, but they just might make syrup for a long long time!
    Regards,
    Chris
    Casbohm Maple and Honey
    625 roadside taps + Neighbors bring some sap too!
    3x10 King, WRU, AOF and AUF
    12" SIRO Filter Press.
    2015 Ford F250 PSD sap hauler
    One Golden named Maggie, Norwegian Forest Cat named Lucy
    Too many Cub Cadets
    Ford Jubilee and several Allis WD's, and IH tractors
    1932 Ford AAB ton and a half, dump truck

    www.mapleandhoney.com

  6. #6
    Join Date
    Feb 2018
    Location
    CT
    Posts
    30

    Default

    I just used the refractory cement and it cures nice and tight. The insulation isnt that compressible so it has held up very well in mine. I don’t go slamming wood in either but it’s very durable. The amount of radiant heat when you open the door will singe you’re arm hair! Its wild

  7. #7
    Join Date
    Feb 2017
    Location
    Wisconsin
    Posts
    39

    Default

    Bmeeham19, would you reccomend putting a wire mesh in over the blanket to help hold the cement? Then is it better to spread the refratory cement on or would it be better to lay the arch on its side and just "pour" it in and use the side as a cast. I'm assuming 1" thick on the sides would be good, and 1-1/2" on the back where most logs will hit it. Obviously the thicker I go on the sides, the less open to the pan on top since the firebox gets narrower. Also I"M thinking of adding secondary burn tubes in the space between the firebox and the stack. similar to that in a newish wood stove, do you think this would be a positive addition do they have to be in the firebox itself? Thanks for all the information, I'll gladly hear any other little tips you have as well.
    2016-two straws stuck in tree by the kids-1 pint syrup
    2017-40 taps 8 gal. syrup
    2018-70 taps...19 gal syrup
    2019-90 taps....18.5 gal syrup
    2020- 100 taps....25 gal syrup.....new oil barrel arch
    2021- 85 taps....unknown season

  8. #8
    Join Date
    Feb 2018
    Location
    CT
    Posts
    30

    Default

    I know nothing about secondary air tubes etc.. Fir the cement and brick I just assembled them together like a brick wall, didn’t use any behind the bricks. With the shape of the barrel walls it kinda locks it in once it’s built. It drys really hard and secure. Sorry for the late reply. When I open up my evap I’ll take some pics for you.

  9. #9
    Join Date
    Dec 2002
    Location
    Rock Creek, NC
    Posts
    5,807

    Default

    Quote Originally Posted by For_the_kids View Post
    Bmeeham19, would you reccomend putting a wire mesh in over the blanket to help hold the cement? Then is it better to spread the refratory cement on or would it be better to lay the arch on its side and just "pour" it in and use the side as a cast. I'm assuming 1" thick on the sides would be good, and 1-1/2" on the back where most logs will hit it. Obviously the thicker I go on the sides, the less open to the pan on top since the firebox gets narrower. Also I"M thinking of adding secondary burn tubes in the space between the firebox and the stack. similar to that in a newish wood stove, do you think this would be a positive addition do they have to be in the firebox itself? Thanks for all the information, I'll gladly hear any other little tips you have as well.
    What you need to do is put ceramic blanket on the sides of the firebox and then stack the bricks in front of it like building a brick wall to hold the blanket in place. Use the refractory cement to hold the bricks together. Blanket and brick everything that could be hit by wood. Insulate and brick all of the way to the rails that the pan will sit on. Just blanket will be fine under the pan that is beyond the firebox. Don't bother with secondary air tubes, you want as much flame as possible in contact with the bottom of the pan.
    Russ

    "Red Roof Maples" Where the term "boiling soda" was first introduced to the maple world!

    1930 Ford Model AA Doodlebug tractor
    A couple of Honda 4 wheelers
    Four chainsaws and no chickens!

+ Reply to Thread

Posting Permissions

  • You may not post new threads
  • You may not post replies
  • You may not post attachments
  • You may not edit your posts