+ Reply to Thread
Page 2 of 4 FirstFirst 1234 LastLast
Results 11 to 20 of 34

Thread: Finally building my Sugar Shack!

  1. #11
    Join Date
    Apr 2019
    Location
    Nashville, MI
    Posts
    942

    Default

    Your new digs are taking shape.I too will have water for next year with a hose. I am going to get a tank hot water heater from sportsmans guide. I got a brand new ss sink from my nephew with all new line and faucet for nothing but a jar of syrup. I will really be in heaven with that system. You are going to really like being inside. How big are you planning the cupola?

  2. #12
    Join Date
    Apr 2015
    Location
    almont
    Posts
    158

    Default

    Todays update on my Sugar Shack progress. Had a productive weekend and day today until the rain started this afternoon.100_9132.jpg100_9133.jpg100_9134.jpg
    Clay Stroup
    Stroup's Sugar Bush
    Almont, MI

    2016: 20 taps, 2 gallons
    2017: 80 taps, 12 gallons
    2018: 92 taps, 16 gallons
    2019: 110 taps, 34 gallons
    2020: 140 taps, 31-1/2 gallons
    2021: 155 taps, 32 gallons
    2022: 190 taps, 29-1/2 gallons
    2023: 200 taps, 42 gallons
    Leader WSE 2x6 drop flue
    Mason Steam Pan finishing set up
    D & G 7" Filter Press
    Next Gen 180 HPRO RO
    John Deere Gator 4 x 2
    12 x 18 Sugar Shack built in 2019

  3. #13
    Join Date
    Jan 2015
    Location
    Catskill Mts, Ulster County NY
    Posts
    605

    Default

    This looks great. My biggest mistake with my shack is the dirt floor. My plan is to pour concrete this year (with radiant heat), run a proper sub-panel and water line, and build an extension. But this will have to wait until later in the year.

    You will never regret it once you start to boil indoors!
    Gary / Zena Crossroads / 42˚ 00' 24" N / Hobby in Early '70s, Addiction since 2014

    175+ taps on 3/16 (60 of which are on two Lunchbox Vac/Releasers)
    12x34 timber framed sap house w/attached 10x34 shed roof for storage
    2 x 6 Smoky Lake hybrid pan on Corsair arch with AUF/steam hood/preheater/concentric exhaust
    7.0 KW Sun Power PV System, Smokey Lake Filter Press/Steam Bottler, Modified NGMP RO - 2 4x40 posts 200 gph

  4. #14
    Join Date
    Feb 2017
    Location
    Central Wisconsin
    Posts
    428

    Default

    Quote Originally Posted by claystroup View Post
    Got the treated floor system done yesterday. 2 x 6 that are 16" on center with lots of bracing and 3/4" treated flooring. Now on to framing the walls with the rough sawn lumber from the Amish saw mill. Not bad for a 60 year old retired guy. Attachment 20091Attachment 20092Attachment 20092Attachment 20093Attachment 20094
    Looks great so far. If I may ask, why a treated floor instead of concrete?
    1960 - 1970s 70 taps on galvanized buckets with Dad and Grandpa.
    1970s - 1985 Acted crazy!
    1986 - 2005 20-30 buckets.
    2006- 2017 70 buckets and bags
    2017-2019 100 bags and buckets
    2020 Finally retired!!! 75 buckets, 50-75 on tubing. RO Bucket, New 12 X 16 Shack and a 42X42 flat pan.
    2021-Adding another 125 taps along with a second RO bucket.
    2022- Shooting for 350 taps, with 100 on lines.
    Lots of Family and Friends and dogs named Skyy and Nessy!

  5. #15
    Join Date
    Apr 2015
    Location
    almont
    Posts
    158

    Default

    I went with a treated floor system instead of concrete for purely financial reasons. I got multiple quotes for concrete and they were all $1200 to $1500 more than going with the treated floor system. Construction is booming in our area and certain trades can name their price. Small jobs like mine would have been aren't desirable when bigger more profitable jobs are plentiful. I have no concrete experience but a lot of carpentry experience so I decided to do the treated system myself along with all the other carpentry work. It only took me about 7 hours to do the floor system myself so it worked out good for me. Also in our township, I will not be taxed on the building because it is not considered permanent. Our tax assessor said it would save me about $80/year over if I had built it on a permanent concrete foundation. As this is a hobby for me all the costs had to be factored in. My estimate to build my shack was $4200 to $4500 total and so far I am right on budget.
    Clay Stroup
    Stroup's Sugar Bush
    Almont, MI

    2016: 20 taps, 2 gallons
    2017: 80 taps, 12 gallons
    2018: 92 taps, 16 gallons
    2019: 110 taps, 34 gallons
    2020: 140 taps, 31-1/2 gallons
    2021: 155 taps, 32 gallons
    2022: 190 taps, 29-1/2 gallons
    2023: 200 taps, 42 gallons
    Leader WSE 2x6 drop flue
    Mason Steam Pan finishing set up
    D & G 7" Filter Press
    Next Gen 180 HPRO RO
    John Deere Gator 4 x 2
    12 x 18 Sugar Shack built in 2019

  6. #16
    Join Date
    Feb 2017
    Location
    Central Wisconsin
    Posts
    428

    Default

    Those are all good reasons Clay. Yours looks nice.
    I have the equipment and gravel for a base, so I will be doing concrete for mine, but I will be doing the concrete with a friend so the cost will be minimal.
    1960 - 1970s 70 taps on galvanized buckets with Dad and Grandpa.
    1970s - 1985 Acted crazy!
    1986 - 2005 20-30 buckets.
    2006- 2017 70 buckets and bags
    2017-2019 100 bags and buckets
    2020 Finally retired!!! 75 buckets, 50-75 on tubing. RO Bucket, New 12 X 16 Shack and a 42X42 flat pan.
    2021-Adding another 125 taps along with a second RO bucket.
    2022- Shooting for 350 taps, with 100 on lines.
    Lots of Family and Friends and dogs named Skyy and Nessy!

  7. #17
    Join Date
    Apr 2015
    Location
    almont
    Posts
    158

    Default

    Time for an update on my new Sugar House. Finished the rafters today. Installed all the siding last week. I made one change from my original plan and that was going with a 6/12 roof pitch instead of an 8/12. This was done in an interest of age and safety. Namely, at 60 years old the 6/12 seemed much safer for me to frame in and walk on than an 8/12 would be. So far, I have cut every board and pounded every nail myself. Only help I have had was lifting the walls up once they were framed. I am out of lumber now so going to get another load at the Amish lumberyard. Time to build the overhangs and sheet the roof with 1" x 12" then on to framing the cupola.100_9138.jpg100_9139.jpg100_9140.jpg100_9141.jpg100_9142.jpg
    Clay Stroup
    Stroup's Sugar Bush
    Almont, MI

    2016: 20 taps, 2 gallons
    2017: 80 taps, 12 gallons
    2018: 92 taps, 16 gallons
    2019: 110 taps, 34 gallons
    2020: 140 taps, 31-1/2 gallons
    2021: 155 taps, 32 gallons
    2022: 190 taps, 29-1/2 gallons
    2023: 200 taps, 42 gallons
    Leader WSE 2x6 drop flue
    Mason Steam Pan finishing set up
    D & G 7" Filter Press
    Next Gen 180 HPRO RO
    John Deere Gator 4 x 2
    12 x 18 Sugar Shack built in 2019

  8. #18
    Join Date
    Mar 2008
    Location
    Covington Twp. Pa.
    Posts
    580

    Default

    Looking great. You are going to love making good syrup inside.
    2x3 Patrick Phaneuf Divided Pan
    Homemade arch
    RB20 RO Bucket
    121 taps total
    Sugar Shack in future
    Wife into it as much as me
    Also do homebrew

    http://s928.photobucket.com/albums/ad121/ZMANSYRUP/

  9. #19
    Join Date
    Jan 2006
    Location
    Oneida NY
    Posts
    11,575

    Default

    Looks great! You will love it. I'm impressed with the progress you've made too.
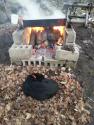
    Back in the 2 or 3 seasons I boiled on a wooden floor I made a platform using concrete blocks and capped it with a sheet of 18 ga. galv. sheet metal. It gave me a raised platform of 8" with a hearth out front. The Hearth stuck out 32" in front with a 1" bend down on each side and the front to keep sparks from getting to the wood floor and on my 2x6 arch the hearth was 46" wide (also with 1" folded down on the sides. Then a second sheet of sheet metal, also 18Ga. went under the first piece about 3" and extended under the firebox. That part was only 2" wider then the base of the arch and it also had 1" bend down on all edges except where it went under the hearth cap. I then had one block under each rear leg for height.
    While I never had any problems with the wood floor, I was far more comfortable (peace of mind) after I removed that wood floor and put in the concrete. I used to use one side of the hearth width to stage my next fueling of wood on, it was quite handy.
    Dave Klish, I recently ordered a 2x6 wood fired evaporator from A&A Sheet Metal which I will be converting to oil fired
    Now have solar, 2x6 finish pan, 5 bank 7x7 filter press, large water jacketed bottler, and tankless water heater.
    Recently bought another Gingerich RO, this one was a 125, but a second membrane was added thus is a 250, like I had.
    After running a 2x3, a 2x6, 3x8 tapping from 79 taps up to 1320 all woodfired, now I'm going to a 2x6 oil fired and a 200-425 taps.

  10. #20
    Join Date
    Apr 2015
    Location
    almont
    Posts
    158

    Default

    I have a Bill Mason 2 x 5 arch and pans and the ash pit does not sit on the floor but is raised off the floor about 10". I am going to get a piece of sheet steel approx 3' x 5' to put under the front of the arch to keep any sparks from landing on the treated floor. With Bill's arch very little if any heated is radiated to the floor.
    Clay Stroup
    Stroup's Sugar Bush
    Almont, MI

    2016: 20 taps, 2 gallons
    2017: 80 taps, 12 gallons
    2018: 92 taps, 16 gallons
    2019: 110 taps, 34 gallons
    2020: 140 taps, 31-1/2 gallons
    2021: 155 taps, 32 gallons
    2022: 190 taps, 29-1/2 gallons
    2023: 200 taps, 42 gallons
    Leader WSE 2x6 drop flue
    Mason Steam Pan finishing set up
    D & G 7" Filter Press
    Next Gen 180 HPRO RO
    John Deere Gator 4 x 2
    12 x 18 Sugar Shack built in 2019

+ Reply to Thread
Page 2 of 4 FirstFirst 1234 LastLast

Posting Permissions

  • You may not post new threads
  • You may not post replies
  • You may not post attachments
  • You may not edit your posts