+ Reply to Thread
Page 1 of 2 12 LastLast
Results 1 to 10 of 12

Thread: Fire bricking tips for a block arch

  1. #1
    Join Date
    Mar 2011
    Location
    Genesee Township, Michigan
    Posts
    64

    Default Fire bricking tips for a block arch

    With the arrival of a new divided pan this winter, I worked on upgrading my block arch, as best can be done when the temp is below freezing, by adding insulation and a simple grate to raise the fire - I will be putting firebrick along the side and turning the grate.

    I would like to add some firebrick to protect the insulation. However, I will either be rebuilding the block arch this summer or may move up to a homemade steel arch - the bricking will be temporary.

    The side size is such that 3 fire bricks, standing on end will cover most of it. If I add two bricks on their side, it will just about reach the top. The back of the box is just over 3 bricks wide and the area not covered would be overlapped by the side bricks.

    Since it is below freezing, I cannot cement them in place.

    I started putting together the sides and back, using Red Devil Furnace Cement and Fireplace Mortar, but realized, I don't know if that is the right thing to use.
    The goal was to cement the sides and back in the house and put the 3 part in in the firebox? The sides would hold the back in place and, I am not sure how to hold the sides in place - maybe a firebrick cemented to the horizontal solid concrete block would hold them or I could "wedge" them between the back and solid concrete block at the front?

    I am at a loss at what to do.

    Thanks for your input.

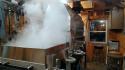
    Insulation w larger firebox.jpg
    The solid block at the bottom is the front limit of the firebox.

  2. #2
    Join Date
    Mar 2005
    Location
    Albion PA
    Posts
    5,099

    Default

    Your thread reminds me of my current unrelated project to remodel a bathroom. I was up half the night worrying about my lack of drywall/ plastering experience.
    Now back to maple: I can tell you for sure that if you have sap in the pans and fire under it you will make syrup! May not be as fast as the big guys but you will get there! Like me and the drywall your way over thinking it. And from your picture your doing just fine!
    Go get the trees tapped and the rest will have to happen! My guess is that you will change it again next season too. Good luck. More pictures too!

    BTW I assume you have another grate too?
    Regards,
    Chris
    Casbohm Maple and Honey
    625 roadside taps + Neighbors bring some sap too!
    3x10 King, WRU, AOF and AUF
    12" SIRO Filter Press.
    2015 Ford F250 PSD sap hauler
    One Golden named Maggie, Norwegian Forest Cat named Lucy
    Too many Cub Cadets
    Ford Jubilee and several Allis WD's, and IH tractors
    1932 Ford AAB ton and a half, dump truck

    www.mapleandhoney.com

  3. #3
    Join Date
    Feb 2013
    Location
    central NH
    Posts
    178

    Default

    If your unsure of what you want for and arch/blocker ch next year. Why not line the inside with hardi backer cement board? Or some durock tile backer? It would be far cheaper if your not sure about the next investment of an arch or rebuilding the block arch. In my opinion.
    Steve

    2017
    2x8 Mason drop tube evaporator
    420 Taps
    3 surflo pumps on 5/16
    79 gallons of syrup made
    2016
    New kitchen addition to sap house
    400 taps
    52 gallons syrup made

  4. #4
    Join Date
    Mar 2011
    Location
    Genesee Township, Michigan
    Posts
    64

    Default

    Quote Originally Posted by whity View Post
    If your unsure of what you want for and arch/blocker ch next year. Why not line the inside with hardi backer cement board? Or some durock tile backer? It would be far cheaper if your not sure about the next investment of an arch or rebuilding the block arch. In my opinion.
    I have used durock around my fireplace insert and found that it is cracking near the high temp areas of my stove. I cannot see it standing up to prolonged fire exposure. For a couple of months it might have worked. Thanks for suggesting it. But I already have the bricks...
    Last edited by jimmol; 02-11-2019 at 08:31 PM.

  5. #5
    Join Date
    Mar 2011
    Location
    Genesee Township, Michigan
    Posts
    64

    Default

    When I got home today, the bricks were sticking to each other and ready to be put in the arch. Pictures below. Think less, do more...

    Now on to my sheet metal door.

    Bricked arch.jpgPan sizing.jpg

  6. #6
    pdiamond Guest

    Default

    very nice looking. good luck this year

  7. #7
    Join Date
    Mar 2011
    Location
    Genesee Township, Michigan
    Posts
    64

    Default

    With the temps staying below freezing I was able to do some more work on the inside. I will post as soon as I can get pictures. Stay tuned.

  8. #8
    Join Date
    Apr 2015
    Location
    New York Porters Corners
    Posts
    28

    Default

    Fellow block archer here. That looks excellent. Remember dont aim for perfection in all the joints and block alignment. Because when alll that mass heats up your frozen ground she will settle a little. I keep a rubber mallet handy to reailign any blocks that move in the process. You might be better to dry lay the fire brick becuase the joints are sure to move. Ive had sucess using old red brick loose stacked in place of fire brick.

    Good luck it will do fine.

  9. #9
    Join Date
    Mar 2011
    Location
    Genesee Township, Michigan
    Posts
    64

    Default

    Here are the latest picts on my block arch.

    Firebrick in place.
    Firebox.jpg
    The firebrick is temporary as I will remove it to rebuild the block arch or move it to a steel arch. I am using Ceramic Blanket around the top to seal and lift the pan so I can add a float. The pan sits 1/2" on each side of the firebox.

    Ash Pan
    Ash Pan.jpg The Ash Pan which is raised a bit from the bottom by a patio block. It is made from sheet metal bent up in back and and up and forward in front, no sides. Can slide it out.
    If you look at the top when the cross block meets the side block you see the 3/8 L steel which I used to raise the front end up. Over the years the two 2 ft square patio blocks the arch rests on have settled in the sand they were laid on so the back is about 3/8 to 1/2 inch higher than the front. The left side was a bit lower than the right and had to be leveled. With all the gaps from leveling, it may get air from all sides, save the insulation will stop that.


    "Door"
    Front Doors.jpg
    The "doors" are sheet metal bent in a U shape. The firebox doors have Rockwool insulation. The lower doors are two in number so I can move one out to let more air out. The handles of the firebox are insulated between the handle and door by ceramic blanket. Will be interesting to see if they get hot.
    The ceramic blanket on the left side was inserted to increase the width from the block size of 15 3/4 to 16 3/4 wide. This way the pan has more exposure to the fire. Will see if it seals any air leaks.

    Pan on top.jpg
    Pan on top. With the thickness of the block I had to extend the draw off to get to the filter and pan I will be using beside the arch.

    When I get everything hooked up for the test boil I will post a few more.

  10. #10
    Join Date
    Apr 2015
    Location
    New York Porters Corners
    Posts
    28

    Default

    Thats the most insulated block arch I've seen. Will boil great and be efficient most likely. Very nice. Great work

+ Reply to Thread
Page 1 of 2 12 LastLast

Posting Permissions

  • You may not post new threads
  • You may not post replies
  • You may not post attachments
  • You may not edit your posts