


That will work. You will want to attach the stack to the extension you are welding up using screws or steel pop rivets.


That will work. You will want to attach the stack to the extension you are welding up using screws or steel pop rivets.
Dave Klish, I recently ordered a 2x6 wood fired evaporator from A&A Sheet Metal which I will be converting to oil fired
Now have solar, 2x6 finish pan, 5 bank 7x7 filter press, large water jacketed bottler, and tankless water heater.
Recently bought another Gingerich RO, this one was a 125, but a second membrane was added thus is a 250, like I had.
After running a 2x3, a 2x6, 3x8 tapping from 79 taps up to 1320 all woodfired, now I'm going to a 2x6 oil fired and a 200-425 taps.
Here's what I've come up with( top will get cut out to a oval x 8" stack when I get one...)
IMG_20180821_140051435.jpg
IMG_20180821_145339225.jpg
Hopefully tomorrow I'll get this thing wrapped up as far as I can go for now till I get stack components
Need to move wall in SS 6' and add center floor drain, add gravel, compact, maybe concrete if I get to it before I go elk muzzleloader hunting in Colorado...
Hey maple flats,
Why not weld my oval stack piece into flat top area?
You could weld it, but when it needs changing you would then need to deal with that then.
Dave Klish, I recently ordered a 2x6 wood fired evaporator from A&A Sheet Metal which I will be converting to oil fired
Now have solar, 2x6 finish pan, 5 bank 7x7 filter press, large water jacketed bottler, and tankless water heater.
Recently bought another Gingerich RO, this one was a 125, but a second membrane was added thus is a 250, like I had.
After running a 2x3, a 2x6, 3x8 tapping from 79 taps up to 1320 all woodfired, now I'm going to a 2x6 oil fired and a 200-425 taps.
Gotcha, I'm still thinking over my best way to connect it so I appreciate the options
As thin as smoke pipe metal is even if you welded it on it would only take you a few minutes to cut it off and change it. And on a oil tank arch it should last you around 4 year or more depending on how hot you run it.
Camp Wokanda
Peoria Park District
2023 - 210 on 3/16 shurflo, sap storage shack w/ 1100 gallon tank - 123 gallons
2022 - 210 on 3/16 shurflo, homemade vac filter & water jacket canner - 104 gallons
2021 - 215 on 3/16 shurflo, added 2nd membrane to RO - 78 gallons
2020 - 210 on 3/16 shurflo, upgraded hp pump on RO - 66 gallons
2019 - 150 on 3/16 shurflo, Deer Run 125 dolly RO - 73 gallons
2018 - 120 on 3/16 shurflo, 2x6 raised flue w/hood, homemade arch w/ AUF & AOF - 34.5 gallons
Ok, I had to get some .024 wire for my mig to be able to weld 24 gauge and I did get my floor leveled out and gravel added today, so I'm creating closer to a concrete floor( might still happen this year?)not a big deal if I don't but if I can get it concreted then I won't disturb gravel that's already been leveled/ compacted...
Back when I had a wood floor because the $ were not there, I poured the floor with the fully bricked evaporator in the sugar house. I just made a hoist and raised the rig high enough to pour under it. At the time I had a 3x8, I still use the same arch but with new pans.
For that I got 2 long pipes (each 3/4" x10') and I placed them on top of the bottom cord (the ceiling joists, of the trusses) parallel to the side of the arch and on one end of each I put a T with about 30" long handles to turn the pipes. I then used electrical clamps 1 size too big to anchor the pipes from walking as I cranked the pipes. I then took some cable, attached it to one of the pipes, slung it under the arch and back up to the second pipe. On the end of each turn handle I put a pipe cap. I only had 2 such cables because I thought it too hard to get 3 to share the load equally. Then I started the crank one side but just before it got tight for lifting, I used a roughly 3' board the hold that arm of the crank from unwinding by placing it on top of the joists between the one each side of the crank arm, with that arm pressing on the board. Then I moved to the other side and this time I cranked until the evaporator lifted 3-4" on that side, and I then blocked that from unwinding. I then worked back and forth, raising each side about maybe 6" at a time. When I had it lifted to within a foot of the open ceilings joists I quit lifting. I then screwed a 2x4 vertically to a ceiling joist about 1.5-2' in from each end of the arch. Once I had 4, 1 at each vend and side, I screwed a 2x6 across under the arch, tight to the underside of the arch to hold it more securely. I then backed off on the cables slightly so both the cables and the safeties shared the load. Then I cut off the excess tails on the vertical 2x4's at about 5-6" below where the 2x6 attached, so I could walk under to work. I then removed the wooden floor, hauled in lots of crusher run, packed it using a plate packer. Then I got the concrete poured, mixing my own (I have a tractor mount mixer that does a decent load at a time. About 2 weeks after pouring the concrete, I re-tightened the cables, removed the safeties and lowered the arch onto the finished floor. That worked quite well for me. I did it that way because I didn't feel I could move the rig from the building without damaging it somehow.
Dave Klish, I recently ordered a 2x6 wood fired evaporator from A&A Sheet Metal which I will be converting to oil fired
Now have solar, 2x6 finish pan, 5 bank 7x7 filter press, large water jacketed bottler, and tankless water heater.
Recently bought another Gingerich RO, this one was a 125, but a second membrane was added thus is a 250, like I had.
After running a 2x3, a 2x6, 3x8 tapping from 79 taps up to 1320 all woodfired, now I'm going to a 2x6 oil fired and a 200-425 taps.
Made more progress on my OTE today.
IMG_20180831_104459242.jpg( oval stack cut into rectangular stove flue.
IMG_20180831_160815710.jpgAUF feeder tube drilled and end welded on/ cut to final length( first holes 8" from door)
IMG_20180831_140349823.jpgdoor bolted on( bought used and plan on insulating it and wrapping round stove rope around inside of door to create "airtight" as I'm going to get for this year...
IMG_20180831_135934266.jpgbolts welded inside for attaching 1"fireblanket
Need to get a fan/ gate for attaching to 2" feeder tube pipe from rear of stove ...
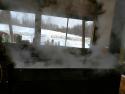
Getting evaporator pan/ preheater pans made from WF Mason and can't wait to do a test boil with some H2O!!!
IMG_20181025_130133348_HDR.jpgIMG_20181025_130201447_HDR.jpg
Finally got her ceramic blanket installed today!!!
 Posting Permissions
 Reply With Quote