+ Reply to Thread
Page 2 of 3 FirstFirst 123 LastLast
Results 11 to 20 of 25

Thread: My oil tank arch build

  1. #11
    Join Date
    Mar 2017
    Location
    Saratoga, NY
    Posts
    98

    Default

    I had an inquiry about how things were going on another thread and have decided to paste my response here as well. I'm really enjoying this thing!

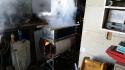
    I've been really pleased with it. Actual rate is a bit hard to determine as it really depends how hard I push it. I've gotten more aggressive in adding wood and it has definitely responded. I easily hit 10gph when I am stoking it hard.

    I suspect a preheater for my sap will increase that rate- I'm debating the best way to build this for next year- thinking of a split pan so I can heat one side while I am filling from the other side, but this may be way overkill.

    I'm also thinking that the ramp may benefit from being closer to the pan, I was planning on insulating that area, but haven't gotten to it- I'm planning on experimenting with some firebrick and sand to see if that makes a difference. I'm happy with how I built it though as it is pretty easy to move it up, but it's hard to move it down.

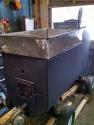
    Things I did right- make the fire box deep enough to get a 16" piece of fire wood in straight. I find that I cross stack and having the ability to go straight in makes life easy.

    I'm still not certain whether my blower should be closer to the fire or a bigger blower. It certainly makes the fire more intense, but I'm not experienced enough to tell what would make it even better.

    The pan is 26" x 48" no dividers. After reading much about continuous flow, I am convinced that this is the method best for me. Continuous flow just seems overkill for my operation (36 taps this year, but enough maples to go up to 50 if I desire).

    All in all I absolutely love it and its completely great for my operation. I am scheming on upgrades for the fun of further construction more than the need for higher efficiency.

    Peter
    Last edited by crzypete; 03-13-2018 at 09:43 PM.

  2. #12
    Join Date
    May 2012
    Location
    Ellenburg Center, NY
    Posts
    61

    Default

    Crzypete
    run a 2 inch metal pipe from the back to the front through the hole you cut. On the end of the pipe that goes to the front of the barrel make several short cuts on the end of the pipe and bend them over to plug the end of the pipe. Then on the top of the pipe drill 3/8 holes in three different lines down the length of the pipe only under where the fire will be. One line right down the top of the pipe one line at 11 oclock position and one line at the 1 o'clock position. On the other end of the pipe hook up the blower. It works well. Done this way you don't get a lot of ash blowing out of door when opened and you have the air aimed right where you want it. My blower is a leaf blower and it doesn't blow any thing out door with that much power, It will increase the heat in the wood chamber considerably. If you don't already have one fix a plate of metal that fits over the opening of the air Intake of your blower and put a screw in a spot that wont interfere with the fins of the blower so that you can open or close it to control how much air you are pushing through the grates.
    Last edited by brass maple; 03-13-2018 at 10:38 PM. Reason: Add more info
    MATT


    2013 - 35 taps
    boiling on a revamped wood stove. 3 1/2 gallons
    2014 - life stepped in. Made a little
    2015 - Around 45 taps. Homemade barrel evap. 6 gallons made.
    2016 - made 4 1/2 gallons of syrup
    2017 had to take a break this year

  3. #13
    Join Date
    Mar 2016
    Location
    Winter, Wisconsin
    Posts
    138

    Default

    Crzpete- With exception to the fire door, your build looks exactly like the evaporator I built last season.


    https://www.youtube.com/watch?v=Srfksbj39Hk

  4. #14
    Join Date
    Mar 2017
    Location
    Saratoga, NY
    Posts
    98

    Default

    Matt, Thanks for the piping idea. What are you using for pipe? I can't imagine listening to a leaf blower while boiling, ditto all the guys using shop vacs.

    Austin, looks like a nice build. Love these oil tank evaporators!

    Anyone have ideas towards a pre-heater? I am having grandiose ideas of a contoured stainless pan that sits on the top curved area of the tank and has a hole for the chimney to pass through. Why? because it sounds like a fun challenge to build and would look cool. Functional? Maybe? Stupid? Definitely!

    Pete

  5. #15
    Join Date
    Apr 2013
    Location
    Speyside, Ontario
    Posts
    271

    Default

    I use a bathroom fan. Probably around $30 at home depot and not very loud. Add a speed controller for maximum adjustability.
    2015 - 8 buckets, 332L sap, 8.5L syrup - Barrel evaporator, 2 steam pans
    2016 - 8 buckets, 432L sap
    2017 - 10 bags, 470L sap, 9L syrup
    2018 - 20 bags, 1050L sap, 17.6L syrup
    2019 - 20 bags, 970L sap, 22.2L syrup
    2020 - 17 bags, 813L sap, 17L syrup

  6. #16
    Join Date
    Mar 2018
    Location
    Two Harbors, Minnesota
    Posts
    134

    Default

    This is the one I made last year.
    https://youtu.be/oNUk0AQvoeU
    2016- 32 taps, 3 1/2 gallons
    2017- 150 taps, 13 gallons after building an evaporator
    2018- goal is 240+ taps. 20+ gallons.
    2018 Reality- 235 taps, 5 gallons of syrup. Average 50 birch taps and 3 gallons of syrup.
    2019- 180 maple taps, 20 gallons of finished syrup.
    ~ 160 birch taps, 13 finished gallons of syrup.

    Latitude 47.278150

    www.facebook.com/livingoffmyland2015

  7. #17
    Join Date
    Mar 2015
    Location
    North Bay
    Posts
    68

    Default

    Very similar to the one i have as well. I have one large flat pan (22 x 34) and one 12 x 22 finisher. Also have room at the back for 2 large stock pots for preheating. Last year I added a small quiet cage fan connected to the 2" hole under the front door. I went from 6-7 gph to easily boiling away 10-12 gph. The fan blows about the same amount as a hair dryer, but really keeps the fire hot. (and no buildup of coals) If I have to step away for a bit, I load up the unit with wood and sap, unplug the fan and it would simmer away with no worries. Mine is fire brick front end with a ramp to the stack. Short of buying a drop flue pan, not much more I can do to increase the gph.

    2016 - 90 taps and a brick lined oil tank arch (60L of syrup)
    2017 - 100 taps (60L)
    2018 - 60 taps (12L of syrup)
    2019 - 75 taps (22L of syrup)
    2020 - 75 taps (25L of syrup)

  8. #18
    Join Date
    Mar 2005
    Location
    Albion PA
    Posts
    5,099

    Default

    Nice build! Probably what I should have started with!
    You did the right thing on the big flat pan. getting gradient on a pan this size is not always easy.
    Regards,
    Chris
    Casbohm Maple and Honey
    625 roadside taps + Neighbors bring some sap too!
    3x10 King, WRU, AOF and AUF
    12" SIRO Filter Press.
    2015 Ford F250 PSD sap hauler
    One Golden named Maggie, Norwegian Forest Cat named Lucy
    Too many Cub Cadets
    Ford Jubilee and several Allis WD's, and IH tractors
    1932 Ford AAB ton and a half, dump truck

    www.mapleandhoney.com

  9. #19
    Join Date
    Mar 2018
    Location
    Morris nj
    Posts
    1

    Default

    Hey Pete - this is my second year of sugaring and am looking to increase production by building an oil tank evaporator. Great pictures! I have a question for you. In the third picture of the inside there are holes drilled into the metal. What are those for? Do you have any hints or tips for making a successful evaporator?

    Thanks!

  10. #20
    Join Date
    Mar 2017
    Location
    Saratoga, NY
    Posts
    98

    Default

    I think you're looking at the photo with the two large bungs that were originally part of the top of the oil tank. I eventually welded them shut. I really tried to use as much of the tank as possible.

    My biggest tip would be to design the fire box around the size of your preferred wood length. You'll want to be able to get them straight in easily. the fire is so unbelievably hot there is not much time for messing around when you are loading it. If I didn't wear gloves when I was loading it, I would burn off my mid-digit hair.

    I wish I had a bit more of a lip from the bottom of the door to the grate- it would hold the mountain of coals in a bit better.

    Otherwise, I'm pretty pleased with the result. I'm planning some tinkering for next year, but this was the big hurdle. First and foremost is a pre-heater. I've been scheming on some fancy sheet metal ideas, but think I my be over-thinking it.

    I'm also tempted to build a drop flue because it looks like a fun build project- I have been scheming on how to bend the flues with my press brake. But I suspect time and energy will get the best of this scheme.

    My season total ended up being 10 gallons of syrup this year! A very nice improvement on last years 3 gallons. I pulled my buckets yesterday and called it a year.

    Anyway, good luck with your build and ask any other questions you have, I'll try to help.

    Pete

+ Reply to Thread
Page 2 of 3 FirstFirst 123 LastLast

Posting Permissions

  • You may not post new threads
  • You may not post replies
  • You may not post attachments
  • You may not edit your posts